
Addlemoth Demo
Addlemoth Dev Update: March 2022
For this month's development update for Addlemoth, I bring to you, two new map themes! It's not as much as I would have liked to do this month but I have been very busy.
This is all WIP for the main game, and not an actual update for the demo or anything.
Keep scrolling because I'm going to explain how I make these, too!
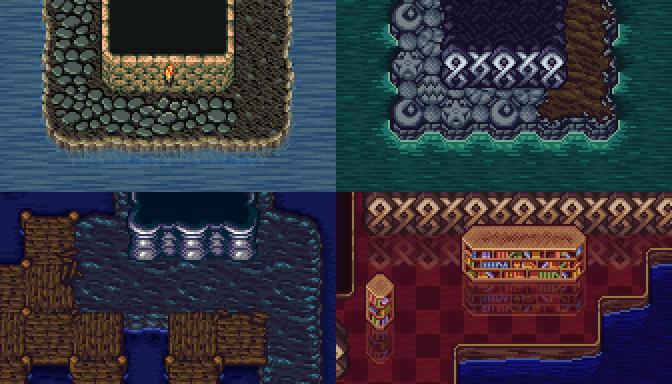
First new map theme are the crypts. With animated fog!
I'd struggled a bit on what to do for this theme's aesthetics. I knew I wanted to recolor the brick walls and have a new, stoney floor layer, but I wasn't sure on the best way to do the water. Eventually after sifting through a variety of other games' looks, I had the idea to add an animated fog layer to the crypt's floor. I think that came out really well, all things considered!
For a long time, I had avoided adding shader effects to the game, because I wanted to focus on teaching myself to draw pixel art, but I'm laxing off on that and adding simple effects where appropriate.
Also, as shown last month, the hellhounds got a pixel facelift!
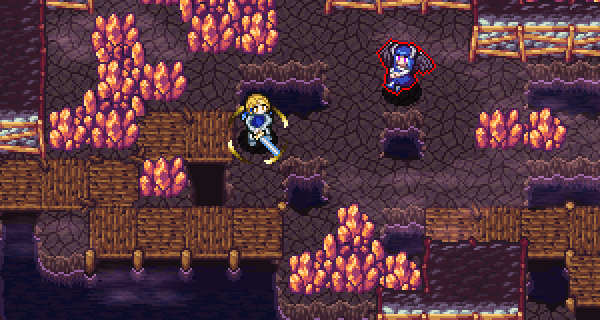
The second new theme are the mines. I actually wasn't sure if I was going to make this at all, but once I got started I just kept going until it was basically done, so, uh, here have it!
The water is still unfinished, it needs some animation and texturing work.
After adding the foggy water in the crypts, I realized I could add a small fog overlay to every map theme, so I just went ahead and did that, and now everywhere can be a little more spooky than before!
It takes time to put these together, so while I'd like to have more to show for this month... well, I don't, sorry! Instead, I'm going to talk about...
Making map themes!
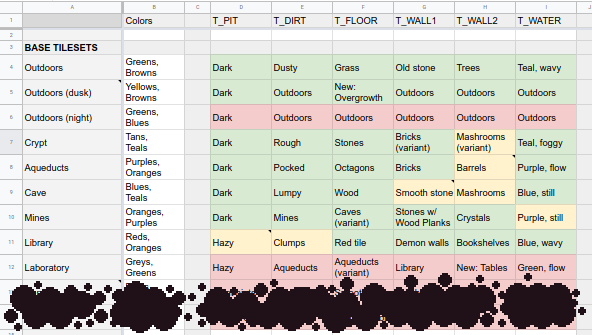
Addlemoth stores its tilemap as a list of tile types, such as T_DIRT and T_WALL1. From these, a set of layers are generated of tilemaps on top of that.
For the crypts theme, the scene drawing goes something like this:
- T_PIT and T_DIRT layer. Draws the dark abyss and base floor layer.
- T_WATER layer. Draws the water on top of the base. In many tilesets, I also animate this on a global timer.
- T_FLOOR layer. Draws the stone floors; note that these go on top of the base floor!
- T_WALL1 and T_WALL2. Draws the walls on top. These are actually split into two background and foreground layers automatically, so they go behind and in front of the player appropriately depending on location.
- Miscellaneous decorative elements, shadows, player objects, etc.
I'm not strictly stuck to this particular display for every tileset! In fact, the layer ordering varies a bit from one to the next.
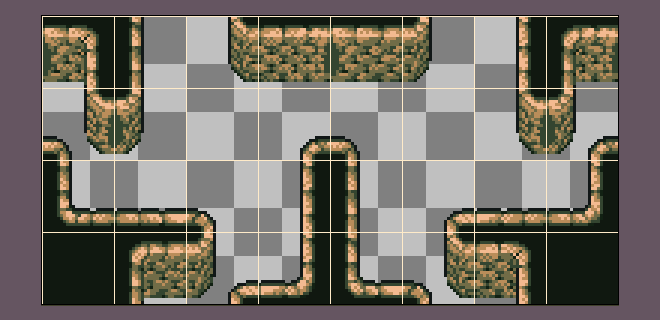
All of the map tiles are made in aseprite, which is a great tool that I heartily recommend, and are 16 tile sets of what's known as 2-Corner Wang Tiles, sometimes also known as Terrain Tiles.
Rather than filling a map location on their own, these are drawn at the corners of four map locations. This allows the edges to extend outside of the map's grid boundaries slightly, and can give a more natural feel to the scene than a more traditional Blob tileset may give you. It also allows a facsimile of classic SNES-era JRPG aesthetics, which fits the more earthen, derelict ruin feel of much of the game.
And, because I'm layering these, they don't actually have to line up with the grid itself; I can draw each layer with its own skew and offset. This leads to things like the wall layers showing more of their front than their backsides,
You probably have noticed that while I said these are 16 tile sets, I have 32 tiles up there. One of my observations about puzzle games is that you always want to be able to know the grid, because lining things up correctly is very important from a player's perspective, so I had to figure out how to convey this to the player while, well, preferably, not actually having a grid. I eventually settled on checkerboarding all of the tiles, so we have one tile each for odd and even corners. This has added some time to the creation of each set of tiles, but not as much as you'd think!
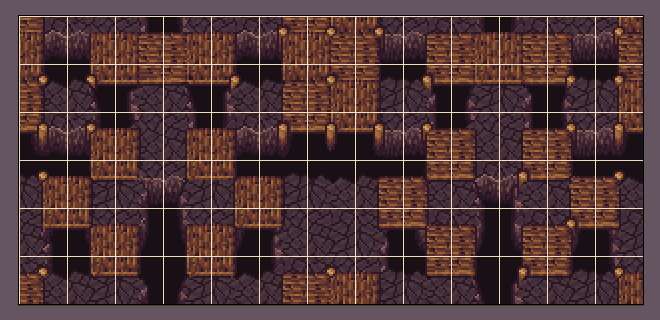
For the mines and caves themes in particular, I have a wooden floor suspended by posts that varies in appearance whether it's connected to land or to a pit/water. As this puts it on the same layer as both the floor and pit, I had to upgrade this from a 2-Corner set, which bridges two map location types, to a 3-Corner set, which does three at once. This changes it from 16 tiles to a whopping 81 tiles.
Which comes a total of 162 after I checkerboard. That's a lot!
Instead of doing this all at once, I opted to do three 2-Corner tilesets, one for each tile type pair, and then create a patch tileset for the remaining 36 tiles that cover all three tile types. This makes it a lot more manageable, and I think the quality of the results speaks for themselves.
I couldn't find any existing templates for this, so this involved making a small program to brute force a nice simple mirrored template I could use. The central vertical line of tiles on this one isn't used, so the mirroring lines up correctly, but that's fine.
And last, but definitely not least, all of the tiles I make are then fed through an asset packer I wrote which shoves them all in nice clean little textures for the renderer to use. These are automatically generated with a tile manifest, so I don't have to do any of this by hand beyond telling it where the output files are.
One of the biggest lessons I learned from this project is to make it as simple as possible to convert assets from a working, human-editable format into a game friendly format. Never again will I force anyone to work in direct in-game assets.
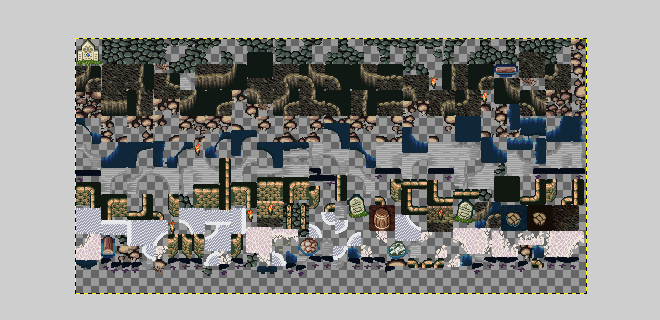
This image was also in the January update.
The process of making a map theme has involved making a mockup in aseprite of what I think it should look like, respecting tile boundaries and checkerboarding, and then copying out the first pass of the tiles as a starting basis. You can probably see how I started with the crypt mockup in the upper left and made the tileset from there.
I mix and match parts a lot because, well, I want this game done before I'm even older and greyer than I already am, but I try to keep a unique spin on it for each locale so it doesn't feel as egregious about the reusage. So changing palettes, recontextualizing, etc. Less effort, more style.
The library tileset needs a floor layer facelift, I'm very unhappy with how it looks in game right now, but I'll need to do some mockups first.
As far as progress goes for the entire game, I estimate that I'm currently about 70% completion on the map themes right now. The rest are mostly variants or [REDACTED].
This feels like I chewed off an awful lot for a silly puzzle game that probably isn't going to get a lot of burn, but, y'know, this is the game I wanna make, so I'm gonna do it.
Just you wait until I get back to working on the remaining sprites!
Forever ago, I made a little tutorial gif to post on my Twitter. I'm adding it here for the sake of it! It explains the same things. It is based on much, much older versions of the same tiles, so as you can see things have improved in appearance a bit since then!
Anyway! That sums up both the update for this month and everything I was able to make for it. If this has been of interest, and you haven't tried the game out yet, please play the demo on itch! You can play it in a browser!
Thanks for reading!
Comments
Log in with itch.io to leave a comment.
Very interesting, thanks for posting!